tf的seq2seq
标签:seq2seq, tensorflow目录
使用tf,但独立于tensorflow/models之外的一个seq2seq的框架:
主页:https://google.github.io/seq2seq/
1. 简介
对应的论文: Massive Exploration of Neural Machine Translation Architectures
整体架构图:
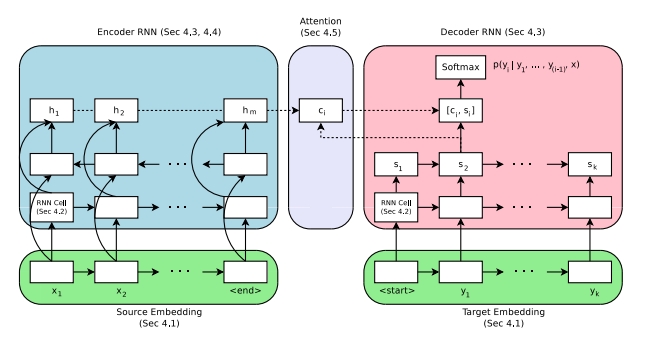
2. 安装
首先安装python-tk(python的gui)
apt-get install python-tk
然后设置matplotlib的backend
echo "backend : Agg" >> $HOME/.config/matplotlib/matplotlibrc
然后安装seq2seq
cd seq2seq
pip install -e .
测试一下
python -m unittest seq2seq.test.pipeline_test
3. 基本概念
4. 示例:nmt
经典:
- Neural Machine Translation by Jointly Learning to Align and Translate
- Neural Machine Translation and Sequence-to-sequence Models: A Tutorial (Neubig et al.)
- Tensorflow Sequence-To-Sequence Tutorial
4.1 数据格式
正常的分词是空格切分或者常用的分词工具(如Moses的tokenizer.perl、框架有spacy/nltk/stanford的分词)。
但用于nmt时存在如下问题:
- nmt输出的是在词上的概率分布,所以如果可能的词很多,那么会非常慢。如果vocabulary中有拼错的词和派生词,那vocabulary就可能趋向无穷大……而我们实际上可能会人工限制vocabulary size在10,000-100,000的范围内。
- loved和loving来自同一词根,但却被当成完全不同的两个词来看待。
对于这种open vocabulary的问题一,一种解决方法就是从给定的文本中学习subword units。例如,loved可以被分成lov和ed,loving可以被分成lov和ing。这样,一方面可以产生新的词(unknown words),另一方面,可以缩减vocabulary size。本示例用到的就是Byte Pair Encoding (BPE)
用法:
# Clone from Github
git clone https://github.com/rsennrich/subword-nmt
cd subword-nmt

# Learn a vocabulary using 10,000 merge operations
./learn_bpe.py -s 10000 < train.tok > codes.bpe

# Apply the vocabulary to the training file
./apply_bpe.py -c codes.bpe < train.tok > train.tok.bpe
结果如下,会用对不常见的词(如例子中的Nikitin)使用@@进行切分。
Madam President , I should like to draw your attention to a case in which this Parliament has consistently shown an interest. It is the case of Alexander Ni@@ ki@@ tin .
4.2 数据下载
使用预处理过的English-German WMT’16 Translation Task的数据集进行训练。 参考wmt16_en_de.sh,需要自定义OUTPUT_DIR变量。这个脚本下载数据、使用Moses Tokenizer进行分词、清理了training data、学习了约32,000的vocabulary大小的subword units.也可以直接去google drive下载预处理过的WMT’16 EN-DE Data (502MB)。
格式如下:
| 文件名 | 描述 |
|---|---|
| train.tok.clean.bpe.32000.en | The English training data, one sentence per line, processed using BPE. |
| train.tok.clean.bpe.32000.de | The German training data, one sentence per line, processed using BPE. |
| vocab.bpe.32000 | The full vocabulary used in the training data, one token per line. |
| newstestXXXX.* | Development and test data sets, in the same format as the training data. We provide both pre-processed and original data files used for evaluation. |
然后需要设置环境变量:
# Set this to where you extracted the downloaded file
export DATA_PATH=

export VOCAB_SOURCE=${DATA_PATH}/vocab.bpe.32000
export VOCAB_TARGET=${DATA_PATH}/vocab.bpe.32000
export TRAIN_SOURCES=${DATA_PATH}/train.tok.clean.bpe.32000.en
export TRAIN_TARGETS=${DATA_PATH}/train.tok.clean.bpe.32000.de
export DEV_SOURCES=${DATA_PATH}/newstest2013.tok.bpe.32000.en
export DEV_TARGETS=${DATA_PATH}/newstest2013.tok.bpe.32000.de

export DEV_TARGETS_REF=${DATA_PATH}/newstest2013.tok.de
export TRAIN_STEPS=1000000
4.3 小数据集:generate toy data
直接跑toy.sh就行了,然后设置一下环境变量
export DATA_PATH=
export DATA_TYPE=copy # or reverse

export VOCAB_SOURCE=${DATA_PATH}/nmt_data/toy_${DATA_TYPE}/train/vocab.sources.txt
export VOCAB_TARGET=${DATA_PATH}/nmt_data/toy_${DATA_TYPE}/train/vocab.targets.txt
export TRAIN_SOURCES=${DATA_PATH}/nmt_data/toy_${DATA_TYPE}/train/sources.txt
export TRAIN_TARGETS=${DATA_PATH}/nmt_data/toy_${DATA_TYPE}/train/targets.txt
export DEV_SOURCES=${DATA_PATH}/nmt_data/toy_${DATA_TYPE}/dev/sources.txt
export DEV_TARGETS=${DATA_PATH}/nmt_data/toy_${DATA_TYPE}/dev/targets.txt

export DEV_TARGETS_REF=${DATA_PATH}/nmt_data/toy_${DATA_TYPE}/dev/targets.txt
export TRAIN_STEPS=1000
4.4 定义模型
标准的模型是seq2seq with attention,它有大量的超参数。在example_configs下有small/medium/large等conf,例如,medium的conf:
model: AttentionSeq2Seq
model_params:
  attention.class: seq2seq.decoders.attention.AttentionLayerBahdanau
  attention.params:
    num_units: 256
  bridge.class: seq2seq.models.bridges.ZeroBridge
  embedding.dim: 256
  encoder.class: seq2seq.encoders.BidirectionalRNNEncoder
  encoder.params:
    rnn_cell:
      cell_class: GRUCell
      cell_params:
        num_units: 256
      dropout_input_keep_prob: 0.8
      dropout_output_keep_prob: 1.0
      num_layers: 1
  decoder.class: seq2seq.decoders.AttentionDecoder
  decoder.params:
    rnn_cell:
      cell_class: GRUCell
      cell_params:
        num_units: 256
      dropout_input_keep_prob: 0.8
      dropout_output_keep_prob: 1.0
      num_layers: 2
  optimizer.name: Adam
  optimizer.params:
    epsilon: 0.0000008
  optimizer.learning_rate: 0.0001
  source.max_seq_len: 50
  source.reverse: false
  target.max_seq_len: 50
4.5 训练
单GPU(例如TitanX),即使是small模型,训练WMT’16 English-German数据要收敛得好几天。在8GPU的集群上,用tf的分布式训练,large模型需要2-3天。而对于toy数据,在cpu上,1000 step大概要10min。
export MODEL_DIR=${TMPDIR:-/tmp}/nmt_tutorial
mkdir -p $MODEL_DIR

python -m bin.train \
  --config_paths="
      ./example_configs/nmt_small.yml,
      ./example_configs/train_seq2seq.yml,
      ./example_configs/text_metrics_bpe.yml" \
  --model_params "
      vocab_source: $VOCAB_SOURCE
      vocab_target: $VOCAB_TARGET" \
  --input_pipeline_train "
    class: ParallelTextInputPipeline
    params:
      source_files:
        - $TRAIN_SOURCES
      target_files:
        - $TRAIN_TARGETS" \
  --input_pipeline_dev "
    class: ParallelTextInputPipeline
    params:
       source_files:
        - $DEV_SOURCES
       target_files:
        - $DEV_TARGETS" \
  --batch_size 32 \
  --train_steps $TRAIN_STEPS \
  --output_dir $MODEL_DIR
其中,参数如下:
- config_paths:可以输入多个conf文件,会按顺序merge在一起。nmt_small.yml描述模型类型及超参数,train_seq2seq.yml包括了common options,例如,追踪什么metric、多久sample一次response。
- model_params:可以重写模型参数,yaml/json格式。大部分参数其实在nmt_small.yml里都定义了,但
- input_pipeline_train:如何读训练集。例子中是parallel text format。
- input_pipeline_dev:如何读验证集。例子中是parallel text format。
- output_dir:模型的checkpoint和summary的存放位置。
使用tensorboard监控输出目录(有log_perplexity和bleu等指标):
tensorboard --logdir $MODEL_DIR
4.6 预测
export PRED_DIR=${MODEL_DIR}/pred
mkdir -p ${PRED_DIR}

python -m bin.infer \
  --tasks "
    - class: DecodeText" \
  --model_dir $MODEL_DIR \
  --input_pipeline "
    class: ParallelTextInputPipeline
    params:
      source_files:
        - $DEV_SOURCES" \
  >  ${PRED_DIR}/predictions.txt
其中,
- tasks:
- model_dir:
- model_dir:
4.7 使用beamsearch进行decode
beamsearch并不是使用贪心的方法去寻找最可能的词,而是keeps several hypotheses, or "beams", in memory and chooses the best one based on a scoring function.。可以通过指定model_params来使用beamsearch。另外,使用beamsearch会使预测时间变得significantly longer。
python -m bin.infer \
  --tasks "
    - class: DecodeText
    - class: DumpBeams
      params:
        file: ${PRED_DIR}/beams.npz" \
  --model_dir $MODEL_DIR \
  --model_params "
    inference.beam_search.beam_width: 5" \
  --input_pipeline "
    class: ParallelTextInputPipeline
    params:
      source_files:
        - $DEV_SOURCES" \
  > ${PRED_DIR}/predictions.txt
另外,上面的例子显示了,tasks参数可以传多个task进去;另外,还把结果存放在了${PRED_DIR}/beams.npz中。用法:
import numpy as np
r = np.load("/tmp/nmt_tutorial/pred/beams.npz")
print r.files
##得到:['predicted_ids', 'beam_parent_ids', 'log_probs', 'scores']
4.8 基于checkpoint进行评估
infer脚本默认只评估最新的checkpoint,如果想指定checkpoint,可以传checkpoint_path参数。
4.9 计算BLEU
以下命令可以计算bleu:
./bin/tools/multi-bleu.perl ${DEV_TARGETS_REF} < ${PRED_DIR}/predictions.txt
注意:
如果你使用toy造数据,可以直接git clone https://github.com/daiwk/seq2seq.git,然后运行dwk_train.sh即可。
原创文章,转载请注明出处!
本文链接:http://daiwk.github.io/posts/platform-tensorflow-seq2seq.html