tf常用函数
标签:tf目录
特征相关
官方文档参考https://www.tensorflow.org/guide/feature_columns?hl=zh_cn
estimator相关
https://www.tensorflow.org/guide/custom_estimators?hl=zh_cn
如果想要estimator把一个东西输出到tensorboard中,只要自己定义一个scalar就行了(参考https://stackoverflow.com/questions/50264302/trying-to-log-accuracy-of-cnn-tensorflow-on-tensorboard):
loss = tf.losses.mean_squared_error(labels=tf.expand_dims(labels, 0), predictions=logits)
tf.summary.scalar('total-loss', loss)
tf.summary.scalar('avg-loss', loss / flags_obj.batch_size)
基本函数
tf.segment_sum
https://www.w3cschool.cn/tensorflow_python/tensorflow_python-ua7w2jip.html

import tensorflow as tf

with tf.Session() as ss:
    c = tf.constant([[9,29, 30,4], [4, 3, 2, 1], [5,6,7,8]])
    y = tf.segment_sum(c, tf.constant([0, 0, 1]))
    print ss.run(y)
    # [[13 32 32  5]
    # [ 5  6  7  8]]
tf.truncated-normal
tf.truncated_normal(shape, mean=0.0, stddev=1.0, dtype=tf.float32, seed=None, name=None)
从截断的正态分布中输出随机值。 生成的值服从具有指定平均值和标准偏差的正态分布,如果生成的值大于平均值2个标准偏差的值则丢弃重新选择。
在tf.truncated_normal中如果x的取值在区间(μ-2σ,μ+2σ)之外则重新进行选择。这样保证了生成的值都在均值附近。
tf.reduce-*
tf.reduce_mean: computes the mean of elements across dimensions of a tensor. Use this to sum the losses over all the examples to get the overall cost. You can check the full documentation here.
实现代码在tensorflow/python/ops/math_ops.py
tensorflow中有一类在tensor的某一维度上求值的函数。
- 求最大值tf.reduce_max()
- 求平均值tf.reduce_mean()
参数:
- input_tensor:待求值的tensor。
- keepdims:是否保持其他维不变。(之前叫keep_dims)
- axis:要对哪一维进行操作(之前叫reduction_indices),只对这维求max/min,其他维删除。如果设置了keepdims=True,那么其他维的大小保持不变,要在[-rank(input_tensor), rank(input_tensor))范围内。
先看一个简单的例子:
x=tf.constant([[1,4,3],[4,2,6]],dtype=tf.float32) # x.shape=(2, 3)
y = tf.reduce_max(x,axis=1,keepdims=True)
# 2行3列,axis=1就在列维度操作,n列变成1列,即每一行求max,合到一列里
# 相当于只有第1维有值其他几维没东西了,第1维存的是其他几维的max
sess = tf.Session()
print x.shape
print sess.run(y)
print y.shape

y = tf.reduce_max(x,axis=0,keepdims=True)
# 2行3列,axis=0就在行维度操作,n行变成1行,即每一列求max,合到一行里
# 相当于只有第0维有值其他几维没东西了,第0维存的是其他几维的max
sess = tf.Session()
print x.shape
print sess.run(y)
print y.shape
输出:
(2, 3)
[[4.]
 [6.]]
(2, 1)

(2, 3)
[[4. 4. 6.]]
(1, 3)
再看个复杂一点的
x=tf.constant([[[1,2,3],[4,5,6]],[[22,33,44],[55,66,77]]],dtype=tf.float32) # x.shape=(2, 2, 3)

# [
# [
# [
# [1,2,3], [4,5,6]
# ]
# ],
# [
# [
# [22,33,44], [55,66,77]
# ]
# ]
# ]
y = tf.reduce_max(x,axis=0,keepdims=True)
sess = tf.Session()
print sess.run(y)
print y.shape

y = tf.reduce_max(x,axis=1,keepdims=True)
sess = tf.Session()
print sess.run(y)
print y.shape

y = tf.reduce_max(x,axis=2,keepdims=True)
sess = tf.Session()
print sess.run(y)
print y.shape
输出:
[[[22. 33. 44.]
  [55. 66. 77.]]]
(1, 2, 3)

[[[ 4.  5.  6.]]

 [[55. 66. 77.]]]
(2, 1, 3)

[[[ 3.]
  [ 6.]]

 [[44.]
  [77.]]]
(2, 2, 1)
tf.nn
cost
tf.nn.softmax-cross-entropy-with-logits
tf.nn.softmax_cross_entropy_with_logits(logits = Z3, labels = Y): computes the softmax entropy loss. This function both computes the softmax activation function as well as the resulting loss. You can check the full documentation here.
tf.nn.weighted-cross-entropy-with-logits
正常的cross-entropy loss如下:
targets * -log(sigmoid(logits)) +
    (1 - targets) * -log(1 - sigmoid(logits))
其实就是,\(L(\hat y, y)=-(ylog\hat y+(1-y)log(1-\hat y))\)
而所谓的weighted,就是乘了一个pos_weight:
targets * -log(sigmoid(logits)) * pos_weight +
    (1 - targets) * -log(1 - sigmoid(logits))
tf.nn.nce-loss
原理和使用参考https://daiwk.github.io/posts/nlp-word2vec.html#4-nce
https://www.tensorflow.org/versions/r1.9/api_docs/python/tf/nn/nce_loss
抄过来:
在NCE的实现中,使用的是log_uniform_candidate_sampler:
- 会在[0, range_max)中采样出一个整数k(k相当于词的id)
- P(k) = (log(k + 2) - log(k + 1)) / log(range_max + 1)
\[
\begin{aligned}
P(k)&=\frac{1}{log(range\_max+1)}log(\frac{k+2}{k+1}) \\
 &= \frac{1}{log(range\_max+1)}log(1+\frac{1}{k+1}) \\
\end{aligned}
\]
k越大,被采样到的概率越小。而我们的词典中,可以发现词频高的index小,所以高词频的词会被优先采样为负样本。
nce的实现可以参考:https://www.jianshu.com/p/fab82fa53e16
activations
tf.nn.relu
tf.nn.relu(Z1): computes the elementwise ReLU of Z1 (which can be any shape). You can read the full documentation here.
ops
tf.nn.embedding-lookup
tf.nn.embedding_lookup(
    params,
    ids,
    partition_strategy='mod',
    name=None,
    validate_indices=True,
    max_norm=None
)
是tf.gather的generalization。
params:ids: 一个int32或者int64的tensor,包括了需要lookup的idspartition_strategy: 如果len(params) > 1,这个参数有用。有div和mod两种取值,默认是modname: 这个op的名字validate_indices: 已经没用了max_norm:如果非None,如果emb的l2 norm比这个值大,就clip掉
详解:
其中的params是一个list的tensors。
- 如果这个list的size是1,也就是说只有一个vocab_size x emb_size的tensor,那就是普通的emb。
- 如果这个list的size大于1,即
len(params) > 1,这个list里每个tensor第二维要一样(emb的size),第一维可以不一样(每个partition里有多少个词)。其实就是一个大型embedding tensor的partitioning,可以是PartitionedVariable。
如果,那么会根据partition_strategy来进行partition:
- mod的切分方式:
partition号是p = id % len(params)。所以如果有5个id,要分成3个partition,那么结果就是[[0, 3], [1, 4], [2]]。所以这个时候,输入的params的shape就是[(2, emb_size), (2, emb_size), (1, emb_size)]。
- div的切分方式:
partition是连续的。
所以如果有5个id,要分成3个partition,那么结果就是[[0, 1], [2, 3], [4]]。所以这个时候,输入的params的shape就是[(2, emb_size), (2, emb_size), (1, emb_size)]。
返回的shape:shape(ids) + shape(params)[1:],即ids的size x emb_size
tf.nn.conv2d
tf.nn.conv2d(X,W1, strides = [1,s,s,1], padding = ‘SAME’): given an input $X$ and a group of filters W1, this function convolves W1’s filters on X. The third input ([1,f,f,1]) represents the strides for each dimension of the input (m, n_H_prev, n_W_prev, n_C_prev). You can read the full documentation here
实现代码在tensorflow/python/ops/gen_nn_ops.py中。
tf.nn.conv2d(
    input,
    filter,
    strides,
    padding,
    use_cudnn_on_gpu=True,
    data_format='NHWC',
    dilations=[1, 1, 1, 1],
    name=None
)
输入的shape是[batch, in_height, in_width, in_channels],即『NHWC』,一个kernel或filter的shape是[filter_height, filter_width, in_channels, out_channels]。这个函数实现如下功能:
- 对filter进行flatten,变成一个shape是
[filter_height * filter_width * in_channels, output_channels]的2D矩阵 - 将input tensor的image patches进行extract,并组成一个shape是
[batch, out_height, out_width, filter_height * filter_width * in_channels]的virtual tensor。 - 对于每一个patch,right-multiplies the filter matrix and the image patch vector.
output[b, i, j, k] =
    sum_{di, dj, q} input[b, strides[1] * i + di, strides[2] * j + dj, q] *
                    filter[di, dj, q, k]
必须满足strides[0] = strides[3] = 1,对于最common的case,也就是horizontal and vertices strides是一样的, strides = [1, stride, stride, 1]
tf.nn.max-pool
tf.nn.max_pool(A, ksize = [1,f,f,1], strides = [1,s,s,1], padding = ‘SAME’): given an input A, this function uses a window of size (f, f) and strides of size (s, s) to carry out max pooling over each window. You can read the full documentation here
tf.contrib.layers
tf.contrib.layers.flatten
tf.contrib.layers.flatten(P): given an input P, this function flattens each example into a 1D vector it while maintaining the batch-size. It returns a flattened tensor with shape [batch_size, k]. You can read the full documentation here.
tf.contrib.layers.fully-connected
tf.contrib.layers.fully_connected(F, num_outputs): given a the flattened input F, it returns the output computed using a fully connected layer. You can read the full documentation here.
常见问题
如何统计参数量
参考https://blog.csdn.net/feynman233/article/details/79187304
tf下载数据集出现ssl问题时
参考https://blog.csdn.net/wangxiaotian2007/article/details/79284124
例如,修改python-2.7.14/lib/python2.7/site-packages/tensorflow/python/keras/utils/data_utils.py,增加:
import ssl
ssl._create_default_https_context = ssl._create_unverified_context
steps v.s. epoch
整理了一下,大概是这样吧:
epoch:1个epoch等于使用一次训练集中的全部样本训练;也就是训练整个数据集的重复数。 step: number of times the training loop in your learning algorithm will run to update the parameters in the model. 相当于如果每batchsize个样本update一次模型,那么应该就是
\[
num_examples \times epochs / batchsize = steps
\]
如果设置的steps比上面的大,可能会继续训?相当于加多了epoch?如果比上面的数小的话,相当于early stopping吧?
Why do we need this? There are many variations on gradient descent (batch, stochastic, mini-batch) as well as other algorithms for optimizing the learning parameters (e.g., L-BFGS). Some of them need to see the data in batches, while others see one datum at a time. Also, some of them include random factors/steps, hence you might need multiple passes on the data to get good convergence.
nan
https://blog.csdn.net/qq_22291287/article/details/82712050
情况1:loss出现nan
大致的解决办法就是,在出现Nan值的loss中一般是使用的TensorFlow的log函数,然后计算得到的Nan,一般是输入的值中出现了负数值或者0值,在TensorFlow的官网上的教程中,使用其调试器调试Nan值的出现,也是查到了计算log的传参为0;而解决的办法也很简单,假设传参给log的参数为y,那么在调用log前,进行一次数值剪切,修改调用如下:
loss = tf.log(tf.clip_by_value(y,1e-8,1.0))
这样,y的最小值为0的情况就被替换成了一个极小值,1e-8,这样就不会出现Nan值了
tf.clip_by_value这个函数,是将第一个参数,限制在第二、三个参数指定的范围之内,使用这个函数的原意是要避免0值,并没有限制最大值,可以稍加修改,就确保了对于y值的剪切,不会影响到其数值的上限:
loss = tf.log(tf.clip_by_value(y,1e-8,tf.reduce_max(y)))
但是在实际的神经网络中使用的时候,我发现这样修改后,虽然loss的数值一直在变化,可是优化后的结果几乎是保持不变的,这就存在问题了。
经过检查,其实并不能这么简单的为了持续训练,而修改计算损失函数时的输入值。这样修改后,loss的数值很可能(存在0的话确定就是)假的数值,会对优化器优化的过程造成一定的影响,导致优化器并不能正常的工作。
要解决这个假的loss的方法很简单,就是人为的改造神经网络,来控制输出的结果,不会存在0。这就需要设计好最后一层输出层的激活函数,每个激活函数都是存在值域的。
比如要给一个在(0,1)之间的输出(不包含0),那么显然sigmoid是最好的选择。不过需要注意的是,在TensorFlow中,tf.nn.sigmoid函数,在输出的参数非常大,或者非常小的情况下,会给出边界值1或者0的输出,这就意味着,改造神经网络的过程,并不只是最后一层输出层的激活函数,你必须确保自己大致知道每一层的输出的一个范围,这样才能彻底的解决Nan值的出现。
举例说明就是TensorFlow的官网给的教程,其输出层使用的是softmax激活函数,其数值在[0,1],这在设计的时候,基本就确定了会出现Nan值的情况,只是发生的时间罢了。
情况2:更新网络时出现Nan值
更新网络中出现Nan值很难发现,但是一般调试程序的时候,会用summary去观测权重等网络中的值的更新,因而,此时出现Nan值的话,会报错类似如下:
InvalidArgumentError (see above for traceback): Nan in summary histogram for: weight_1
这样的情况,一般是由于优化器的学习率设置不当导致的,而且一般是学习率设置过高导致的,因而此时可以尝试使用更小的学习率进行训练来解决这样的问题。
- 数据本身,是否存在Nan,可以用numpy.any(numpy.isnan(x))检查一下input和target
- 在训练的时候,整个网络随机初始化,很容易出现Nan,这时候需要把学习率调小,可以尝试0.1,0.01,0.001,直到不出现Nan为止,如果一直都有,那可能是网络实现问题。学习率和网络的层数一般成反比,层数越多,学习率通常要减小。有时候可以先用较小的学习率训练5000或以上次迭代,得到参数输出,手动kill掉训练,用前面的参数fine tune,这时候可以加大学习率,能更快收敛哦
- 如果是图片,那么得转化为float 也就是/255.
- relu和softmax两层不要连着用,最好将relu改成tanh,什么原因呢
- 参数初始化
- batch size 选择过小
- 最后还没有排除问题的话,TensorFlow有专门的内置调试器(tf_debug)来帮助调试此类问题https://www.tensorflow.org/guide/debugger
from tensorflow.python import debug as tf_debug

# 建立原来的Session

sess = tf.Session()

# 用tfdbg的Wrapper包裹原来的Session对象:

sess = tf_debug.LocalCLIDebugWrapperSession(sess)

sess.add_tensor_filter("has_inf_or_nan", tf_debug.has_inf_or_nan)

# 以上为所有需要的代码变动,其余的代码可以保留不变,因为包裹有的sess和原来的界面一致。
# 但是每次执行`sess.run`的时候,自动进入调试器命令行环境。

sess.run(train_op, feed_dict=...)
!!!目前看,只能在mac或者windows这种有图形界面的地方玩的哈!!
在tfdbg命令行环境里面,输入如下命令,可以让程序执行到inf或nan第一次出现。
tfdbg> run -f has_inf_or_nan
一旦inf/nan出现,界面现实所有包含此类病态数值的张量,按照时间排序。所以第一个就最有可能是最先出现inf/nan的节点。可以用node_info, list_inputs等命令进一步查看节点的类型和输入,来发现问题的缘由。
来看个简单demo(假设是demo.py):
from __future__ import print_function
import numpy as np
import tensorflow as tf

from tensorflow.python import debug as tf_debug

def test_deubg_nan():
    a_1 = tf.constant([[2, 2, 2], [3, 3, 3]], dtype=tf.float32)
    b_1 = tf.constant([[0., 1, 1], [2, 2, 2]], dtype=tf.float32)
    init = tf.global_variables_initializer()
    sess = tf.Session()
    ## add this
    sess = tf_debug.LocalCLIDebugWrapperSession(sess)
    sess.add_tensor_filter("has_inf_or_nan", tf_debug.has_inf_or_nan)
    sess.run(init)

    m = sess.run(tf.divide(a_1, b_1))

test_deubg_nan()
执行python demo.py,出现如下界面时,输入run -f has_inf_or_nan:
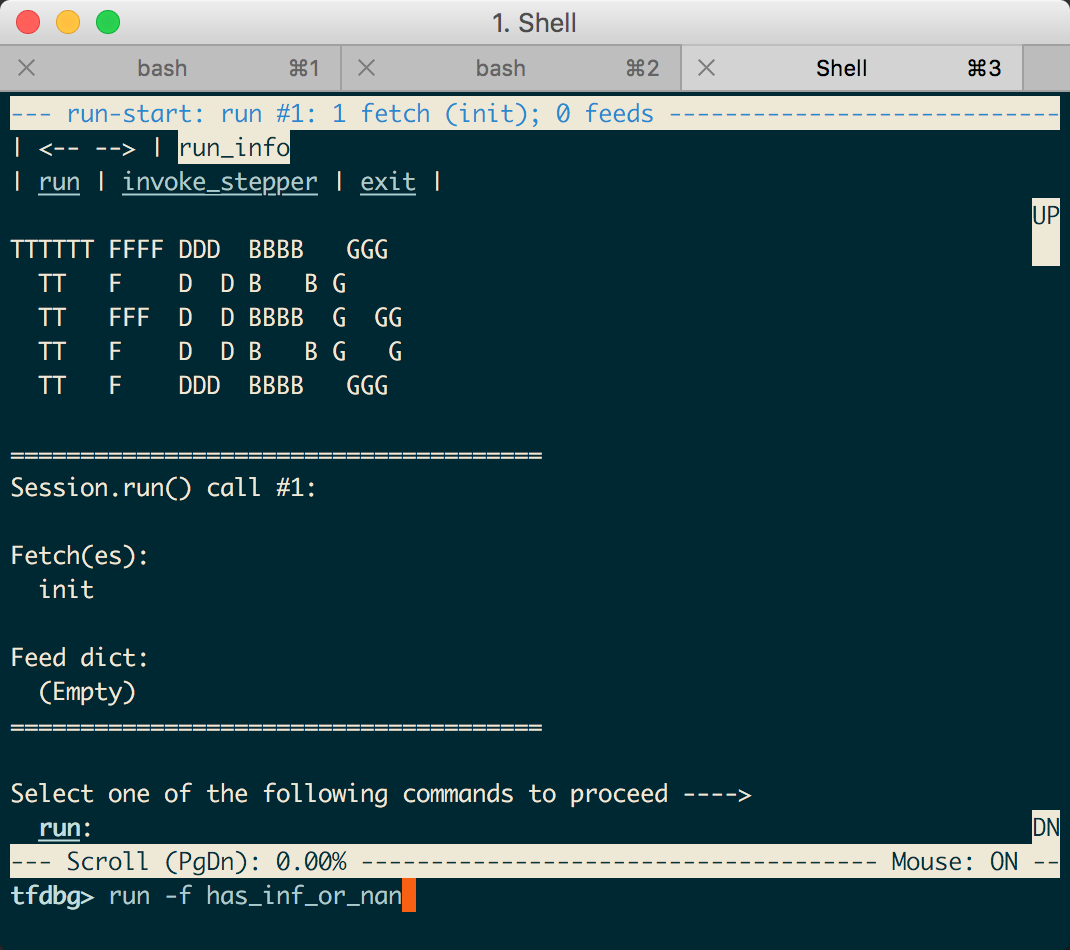
然后在这个页面里,就可以拿鼠标乱点了。。
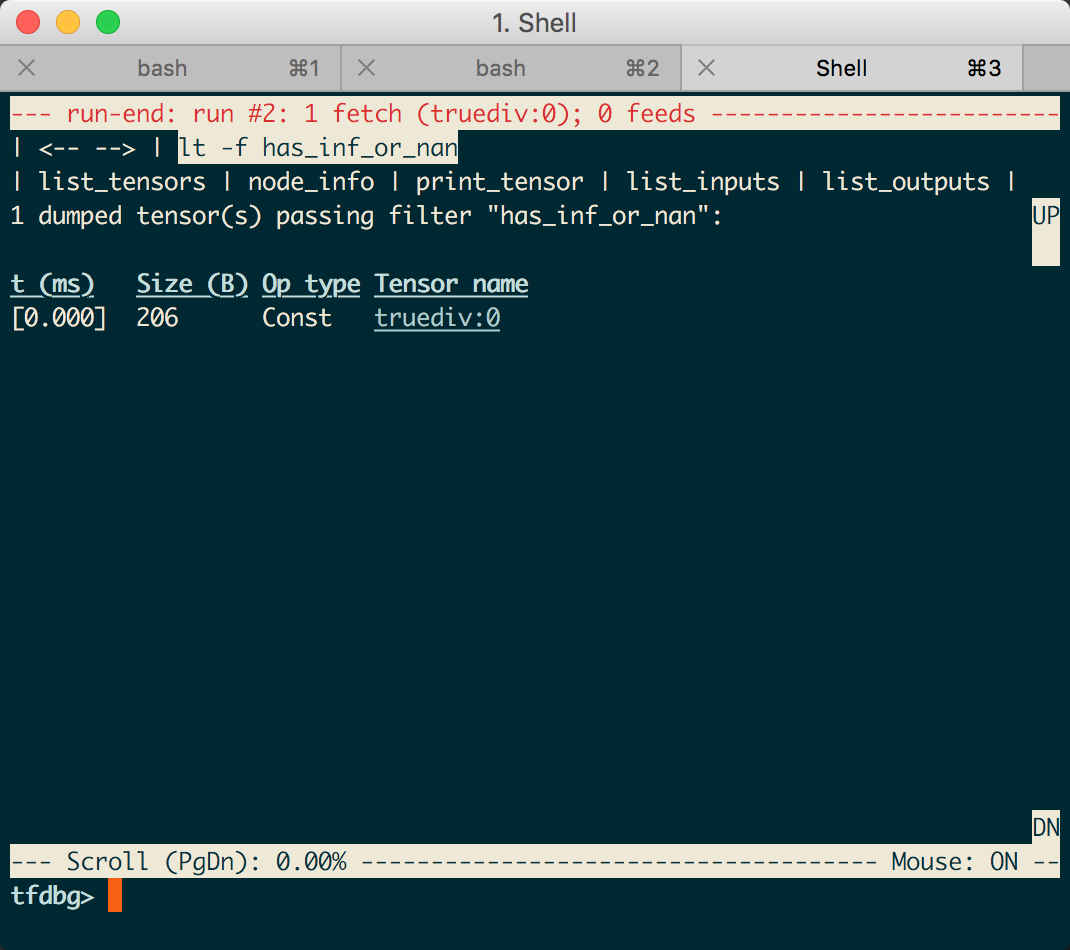
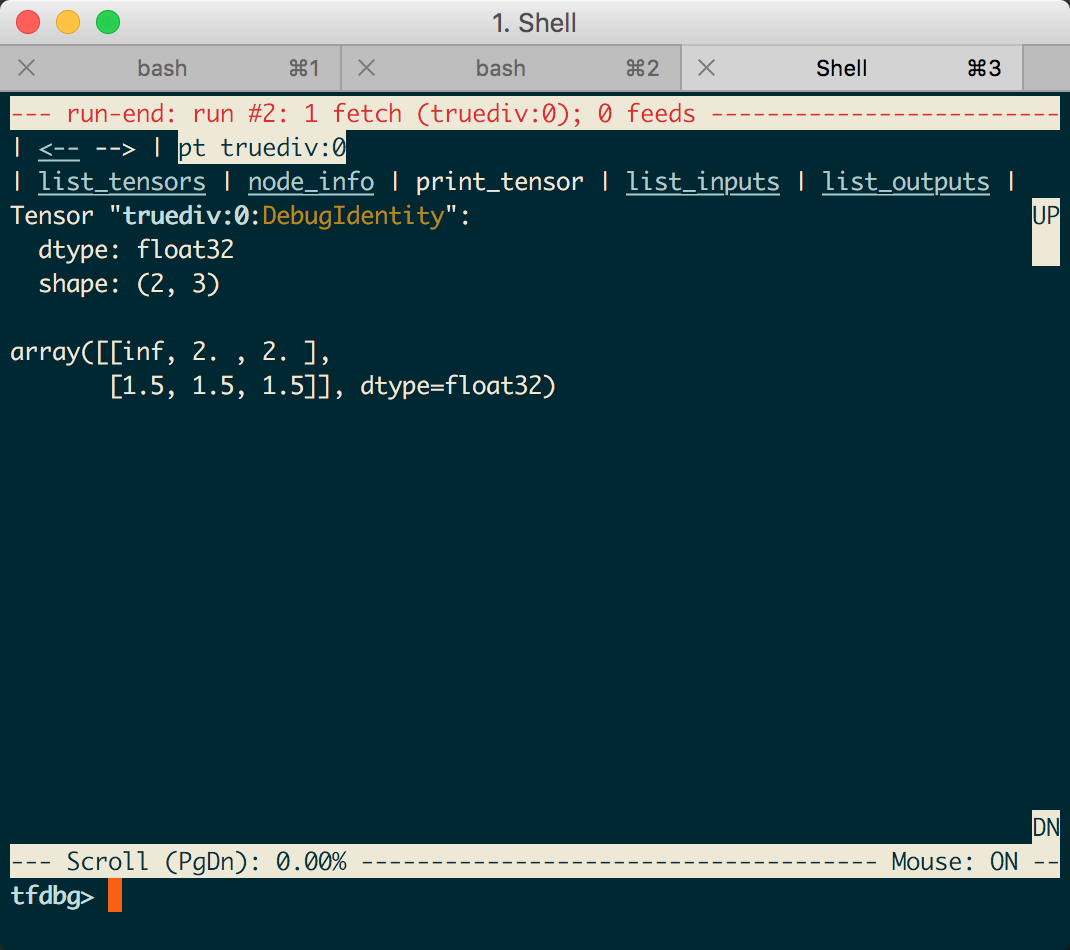
比如点true:div:0,就会出现详情,也可以点左上角的返回啥的,继续看其他tensor啦。。
原创文章,转载请注明出处!
本文链接:http://daiwk.github.io/posts/knowledge-tf-usage.html